|
| |
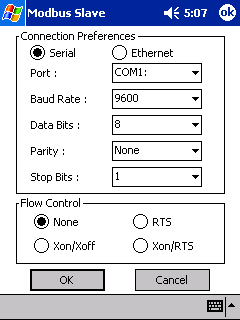
Configure Comms Port
|
 |
|
When configuring the comms port, you will need to specify :
- Serial or Ethernet Connection
- COM Port
- Baud Rate
- Number of Data Bits
- Parity
- Stop Bits
- Flow Control method
|
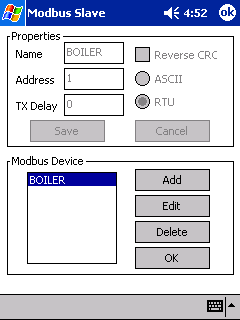
Configure Modbus Device
|
 |
|
When creating a new device, you will need to specify :
- A name for the device
- The Modbus address of the device
- An optional millisecond delay before transmitting data from the device
- The mode of the device, either RTU or ASCII
- Optionally to reverse the CRC in RTU mode (some Modbus devices
implement the CRC the wrong way round !)
|
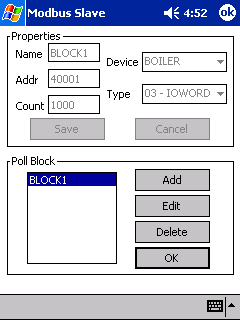
Configure Poll Block
|
 |
|
When creating a new data block, you will need to specify :
- A name for the block
- The Modbus slave device the block is attached to
- The start address of the data block
- The type of data to emulate
- The number of data words/bits in the block (from 1-10000)
|
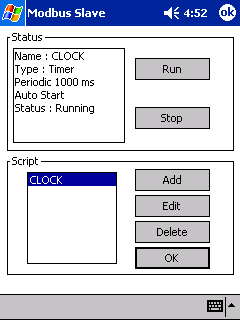
Configure Scripts
|
 |
|
When creating a new script,
you will need to specify :
- A name for the script
- The type of script :
|
Timer Scripts
|
 |
|
When creating a timer script, you
will need to specify :
- The period of the timer (in ms)
- Whether the timer is a one-shot or periodic
- Whether to auto-start the script on loading the configuration file
|
Data Change Scripts
|
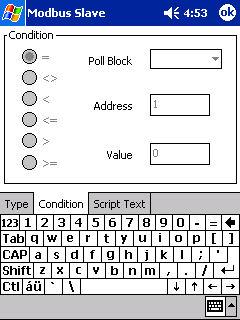 |
|
When creating a data change script, you
will need to specify :
- The name of the poll block you wish to monitor
- The data address within the poll block whose value you wish to monitor
- The value you want to monitor against
- The condition you wish to check
|
Example Script Text
|
 |
When writing the script, you use a language syntax similar to machine code.
There is one instruction per line and it consists of an opcode following by one
or two parameters. The list of opcodes are :
| Opcode | Param 1 |
Param 2 | Comment |
| INC | <tag> |
|
Add 1 to the value of P1 |
| DEC | <tag> |
|
Sub 1 from the value of P1 |
| TOG | <tag> |
|
Toggle the bit value of P1 |
| CLR | <tag> |
|
Set P1 to 0 |
| SET | <tag> |
<tag>|<val> | Set P1 to P2 |
| ADD | <tag> |
<tag>|<val> | Add P2 to P1 |
| SUB | <tag> |
<tag>|<val> | Subtract P2 from P1 |
| NEG | <tag> |
|
Negate P1 |
| STO | <tag>|<val> |
<tag> | Store P1 in P2 |
| JMP | <label> |
|
Jump to label |
| CMP | <tag> |
<tag>|<val> | Compare P1 with P2 |
| JE | <label> |
|
If equal, jump to label |
| JNE | <label> |
|
If not equal, jump to label |
| JL | <label> |
|
If less, jump to label |
| JLE | <label> |
|
If less or equal, jump to label |
| JG | <label> |
|
If greater, jump to label |
| JGE | <label> |
|
If greater or equal, jump to label |
| END | | |
Terminate script |
Where <tag>|<val> is specified, you can either use a tag or an immediate value.
where :
<tag> = data address in the format <block name>:<address>
eg BLOCK1:40001
<val> = numeric value
<label> = line label in the format :<label>
eg :HERE
Please note that line labels must appear on a line on there own and not
followed by an instruction.
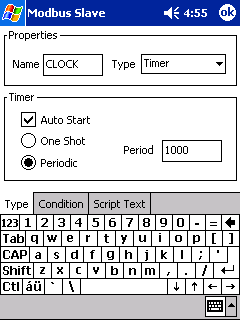
An example clock timer script is :
Script Name : CLOCK
Type : Timer
Periodic with period 1000ms
Script :
INC BLOCK1:40003
CMP BLOCK1:40003 60
JNE DONE
CLR BLOCK1:40003
INC BLOCK1:40002
CMP BLOCK1:40002 60
JNE DONE
CLR BLOCK1:40002
INC BLOCK1:40001
:DONE
END
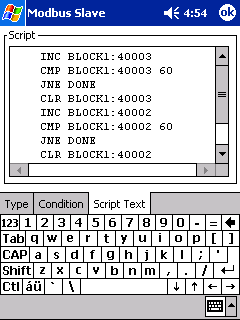
Alternatively, this could be done similarly with one timer script and two
data change scripts, eg :
Script Name : SEC
Type : Timer
Periodic with period 1000ms
Script :
INC BLOCK1:40003
Script Name : MIN
Type : Data Change
Tag : BLOCK1:40003
Condition : = 60
Script :
INC BLOCK1:40002
CLR BLOCK1:40003
Script Name : HOUR
Type : Data Change
Tag : BLOCK1:40002
Condition : = 60
Script :
INC BLOCK1:40001
CLR BLOCK1:40002
These example scripts are assuming you have already created a poll block
called BLOCK1 of type 3 (holding registers) starting at address 40001 with at
least 3 data words in the poll block.
To test these scripts (after entering them in the program of course !), click
on either CLOCK or SEC in the script list then click the Run button. If you then
change view to see BLOCK1 and change the data format to signed integer, you
should see the first three data values simulating a clock, incrementing in value
once per second. You can quickly check the second and minute rollovers by
clicking on address 40003 and/or 40002 and setting it's value to, say, 55 to
speed things up a bit.
If you have ideas for further opcodes or require clarification on any point
of writing scripts, please contact me.
|
